Secure Shell (SSH) is a robust protocol that empowers users to remotely access and manage Raspberry Pi devices over the internet. Whether you're a hobbyist or a professional, learning how to securely SSH into Raspberry Pi can greatly enhance your ability to control your devices from virtually anywhere in the world.
In today's digital landscape, the ability to remotely access devices is more crucial than ever. Whether you're overseeing a home automation system, operating a server, or developing Internet of Things (IoT) applications, being able to SSH into your Raspberry Pi remotely can significantly elevate your productivity and efficiency.
This article will walk you through the process of setting up SSH for Raspberry Pi, securing your connection, and resolving common issues. By the end of this guide, you'll be equipped with the knowledge and tools to confidently SSH into your Raspberry Pi from any location on the internet.
- Dodgercore Today
- Alice Braga Moraes
- Willowbrook Mall Appletore
- Norman Names
- Center For Reproductive Rights
Table of Contents
- Understanding SSH
- Why Use SSH for Raspberry Pi?
- Configuring SSH on Raspberry Pi
- Enhancing SSH Security
- The Role of Port Forwarding
- Dynamic DNS for Raspberry Pi
- SSH Tunneling and Reverse SSH
- Exploring Alternative Remote Access Tools
- Addressing Common SSH Issues
- Final Thoughts and Next Steps
Understanding SSH
SSH, or Secure Shell, is a cryptographic protocol designed for secure communication between two devices over a potentially unsecured network. It allows users to log into another computer remotely, execute commands on a distant machine, and transfer files securely. SSH has become a cornerstone in server management, remote administration, and development environments.
For Raspberry Pi users, SSH is indispensable. It enables remote access to their devices without the need for physical presence. This capability is particularly advantageous for managing headless setups—where the device operates without a monitor or keyboard—or accessing devices located in remote locations.
How SSH Functions
SSH operates by establishing an encrypted channel between the client (your computer) and the server (your Raspberry Pi). This encryption ensures that all data exchanged between the two devices remains confidential and protected from unauthorized access. Additionally, SSH incorporates authentication mechanisms, such as passwords and public-key cryptography, to verify the identity of the user attempting to connect.
Why Use SSH for Raspberry Pi?
SSH offers several compelling advantages for Raspberry Pi users:
- Remote Administration: Manage your Raspberry Pi from any location around the globe.
- Headless Operation: Operate your Raspberry Pi effortlessly without the need for a monitor or keyboard.
- Automation: Execute scripts and commands remotely to automate repetitive tasks.
- Security: SSH ensures encrypted communication, safeguarding your data from interception and tampering.
By harnessing SSH, you can unlock the full potential of your Raspberry Pi, enabling you to undertake a wide range of projects, from personal hobbies to professional applications.
Configuring SSH on Raspberry Pi
Activating SSH on Raspberry Pi OS
Activating SSH on Raspberry Pi is a straightforward process. Follow these steps to enable it:
- Start your Raspberry Pi with the latest version of Raspberry Pi OS installed.
- Open the terminal and enter the command
sudo raspi-config. - Navigate to the
Interfacing Optionsmenu and selectSSH. - Choose
Yesto enable SSH and reboot your Raspberry Pi to apply the changes.
Alternatively, you can enable SSH by creating an empty file named ssh in the boot partition of your SD card before inserting it into the Raspberry Pi. This method is particularly useful when setting up a headless Raspberry Pi.
Enhancing SSH Security
Given the risks associated with exposing your Raspberry Pi to the internet, securing your SSH connection is essential. Below are some best practices to fortify your SSH setup:
- Change Default Credentials: Replace the default username and password with strong, unique alternatives to prevent unauthorized access.
- Use Public-Key Authentication: Disable password-based authentication and rely on SSH keys for secure access. This method is far more secure and eliminates the risk of brute-force attacks.
- Change SSH Port: Switch from the default port 22 to a non-standard port to reduce automated attack attempts.
- Enable Firewall Rules: Restrict SSH access to specific IP addresses or ranges to minimize the risk of unauthorized access.
Adopting these measures will significantly bolster the security of your Raspberry Pi when accessed over the internet.
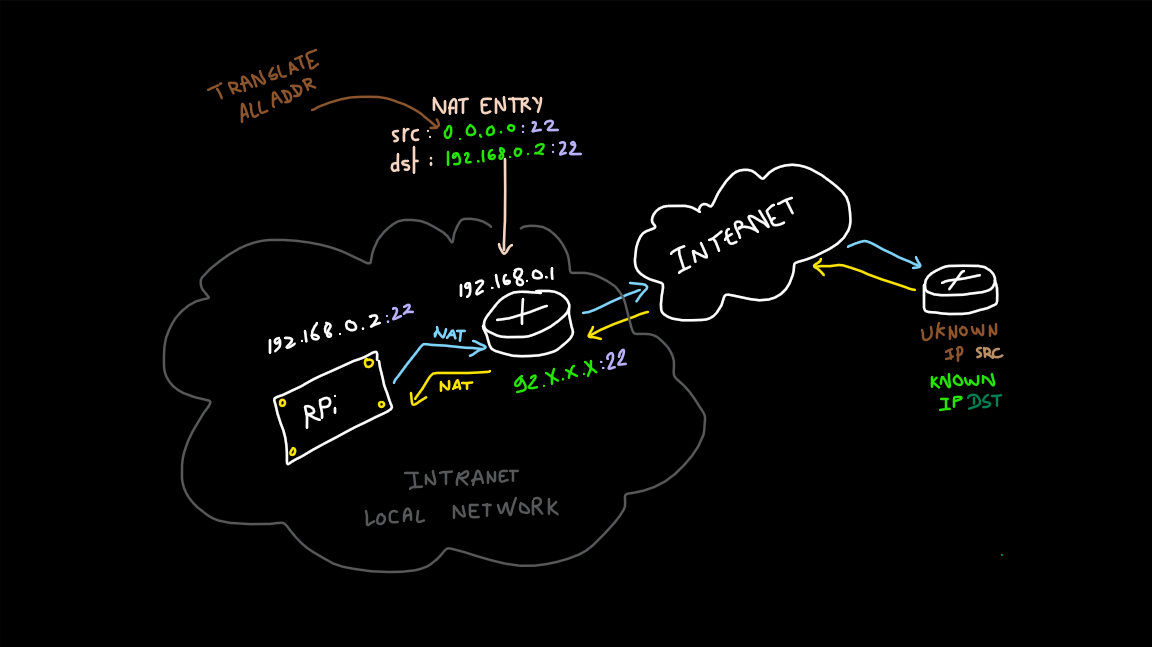
The Role of Port Forwarding
What Is Port Forwarding?
Port forwarding is a networking technique that enables external devices to establish connections with a device within your local network. When you wish to SSH into your Raspberry Pi from the internet, configuring port forwarding on your router is necessary.
Here's how to set up port forwarding:
- Access your router's admin interface using its IP address.
- Locate the port forwarding settings and create a new rule.
- Map the external port (e.g., 22) to the internal IP address of your Raspberry Pi.
- Save the configuration changes and test the connection to ensure everything is functioning as expected.
It's important to assign a static IP address to your Raspberry Pi to maintain consistent connectivity.
Dynamic DNS for Raspberry Pi
Why Utilize Dynamic DNS?
Dynamic DNS (DDNS) assigns a domain name to your Raspberry Pi's IP address, which may change periodically due to DHCP. This simplifies connecting to your device without needing to know its current IP address.
Here’s how to configure DDNS:
- Sign up for a DDNS service such as No-IP or DynDNS and create a hostname.
- Install the DDNS client on your Raspberry Pi.
- Configure the client with your DDNS service credentials.
- Test the setup by pinging your hostname from an external network to ensure it resolves correctly.
With DDNS, accessing your Raspberry Pi becomes more convenient and user-friendly, as you can use a memorable domain name instead of an IP address.
SSH Tunneling and Reverse SSH
What Is SSH Tunneling?
SSH tunneling allows you to forward specific ports through an SSH connection, facilitating secure communication between devices. This technique is especially beneficial when accessing services behind a firewall or NAT.
Reverse SSH is another method that enables you to establish a connection from a remote device to your Raspberry Pi, even if the latter is situated behind a restrictive network.
Here’s how to set up reverse SSH:
- On your Raspberry Pi, execute the command:
ssh -R 2222:localhost:22 user@remote-server. - From the remote server, connect to your Raspberry Pi using:
ssh -p 2222 pi@localhost.
This configuration ensures secure and reliable access to your Raspberry Pi from anywhere in the world.
Exploring Alternative Remote Access Tools
Alternatives to SSH
While SSH remains the most prevalent method for remote access, there are other tools available to manage your Raspberry Pi:
- TeamViewer: A user-friendly remote desktop application that works across multiple platforms, offering an intuitive interface for managing devices remotely.
- VNC (Virtual Network Computing): Allows graphical access to your Raspberry Pi's desktop environment, making it ideal for users who prefer a visual interface.
- ngrok: A tunneling service that provides secure access to local servers over the internet, offering an easy way to expose your Raspberry Pi to the web.
Select the tool that aligns best with your needs and technical expertise to optimize your remote access experience.
Addressing Common SSH Issues
Even with a meticulous setup, you may encounter challenges when attempting to SSH into your Raspberry Pi. Below are some common problems and their solutions:
- Connection Refused: Verify that SSH is enabled and the service is running on your Raspberry Pi. Ensure the firewall rules permit SSH traffic.
- Timeout Errors: Check your router's port forwarding settings and confirm that your Raspberry Pi has a static IP address to maintain a stable connection.
- Authentication Failure: Carefully review your credentials and ensure public-key authentication is correctly configured. Double-check the permissions of your SSH key files.
For additional guidance, consult the official Raspberry Pi documentation or seek assistance from community forums.
Final Thoughts and Next Steps
SSH is an indispensable tool for Raspberry Pi users, providing secure and reliable remote access to their devices. By following the steps outlined in this guide, you can confidently configure SSH, enhance your connection's security, and troubleshoot common issues.
We encourage you to delve deeper by experimenting with SSH tunneling, reverse SSH, and alternative remote access tools. Share your experiences and tips in the comments section below and explore our other articles on Raspberry Pi and related technologies for further insights.
Thank you for reading, and enjoy your journey into the world of Raspberry Pi and remote access!
References:


Detail Author:
- Name : Prof. Jessica Rolfson
- Username : cortney.spencer
- Email : dolores.quitzon@bernhard.com
- Birthdate : 1983-02-09
- Address : 405 Johnny Wall Milanland, AR 79407
- Phone : 351-477-7966
- Company : Mertz-Carroll
- Job : Tank Car
- Bio : Possimus temporibus qui et magnam. Et amet quod mollitia et sapiente sit. In consequatur enim quo necessitatibus quibusdam quis. Ea quia laudantium nemo quod.
Socials
linkedin:
- url : https://linkedin.com/in/mervin_dev
- username : mervin_dev
- bio : Error libero ab quo sed modi laudantium.
- followers : 6620
- following : 2023
tiktok:
- url : https://tiktok.com/@keebler2008
- username : keebler2008
- bio : Omnis natus aut nam at sint iure fugiat. Dolor quibusdam accusamus nisi.
- followers : 695
- following : 433
facebook:
- url : https://facebook.com/keebler1978
- username : keebler1978
- bio : Consectetur dolores error sit voluptatem ut dolores dolorem soluta.
- followers : 6201
- following : 2519
twitter:
- url : https://twitter.com/mkeebler
- username : mkeebler
- bio : Magni laboriosam omnis et quo. Illum ducimus et excepturi aut ea voluptas nemo. Rem repudiandae corrupti modi aut. Eveniet ex et ea voluptatem at modi.
- followers : 6003
- following : 2605
instagram:
- url : https://instagram.com/mervin_dev
- username : mervin_dev
- bio : Id non sapiente commodi ab nisi sit et. Illum voluptatum eum non illum id.
- followers : 3047
- following : 528
