Designing a DIY ribbon rose bouquet is an elegant and cost-effective way to infuse personal creativity into any special occasion. Whether you're planning a wedding, celebrating an anniversary, or simply aiming to enhance the ambiance of your home, crafting your own ribbon rose bouquet can be both enjoyable and fulfilling. This comprehensive guide will walk you through the process step by step, ensuring your bouquet is as beautiful as it is meaningful.
Floral arrangements have long been a staple in decorating events and spaces. However, traditional flower bouquets can be expensive and have a short lifespan. Ribbon roses, in contrast, offer a durable and customizable alternative that can last indefinitely. They are ideal for those who wish to create something unique and timeless that reflects their personal style.
In this article, we will provide a detailed, step-by-step guide to help you craft your very own DIY ribbon rose bouquet. By carefully following these instructions, you'll create a stunning arrangement that will impress family, friends, and guests alike. Let's get started!
- San Juan County Tax Assessor Nm
- Ruth Chris Private Event
- Who Played Lurch On Addams Family
- Moody Blues Question Lyrics
- Nate Robinson Draft Pick
Table of Contents:
- Exploring Ribbon Roses
- Essential Tools and Materials
- Crafting Ribbon Roses
- Building Your Bouquet
- Personalizing Your Bouquet
- Expert Tips for Success
- Avoiding Common Pitfalls
- Maintaining Your Bouquet
- Inspiration and Creative Ideas
- Final Thoughts
Exploring Ribbon Roses
Ribbon roses have gained immense popularity in recent years due to their versatility and timeless appeal. These exquisite roses are crafted from a variety of ribbons, including satin, chiffon, and organza, each offering a unique texture and aesthetic. The art of creating ribbon roses involves carefully folding, cutting, and shaping the ribbon into petals that closely resemble real roses, resulting in a stunning and durable floral alternative.
Why Opt for Ribbon Roses?
There are numerous reasons why ribbon roses are an excellent choice for bouquets:
- Longevity: Unlike fresh flowers, ribbon roses do not wilt or fade over time, making them a lasting keepsake.
- Customization: With a wide range of colors, textures, and sizes available, you can tailor your bouquet to perfectly match your personal style or event theme.
- Affordability: Creating a ribbon rose bouquet is generally more budget-friendly compared to purchasing fresh flowers, allowing you to allocate your resources more efficiently.
Essential Tools and Materials
Before embarking on your DIY ribbon rose bouquet journey, it's crucial to gather all the necessary tools and materials. Having everything prepared beforehand will ensure a smoother and more efficient crafting experience.
Materials:
- Ribbon (satin, chiffon, or organza)
- Wire (floral wire or craft wire)
- Hot glue gun and glue sticks
- Scissors
- Floral tape
- Green ribbon for stems
These materials can be easily sourced from most craft stores or online retailers. Opt for high-quality ribbons and wires to achieve the best results and ensure the longevity of your bouquet.
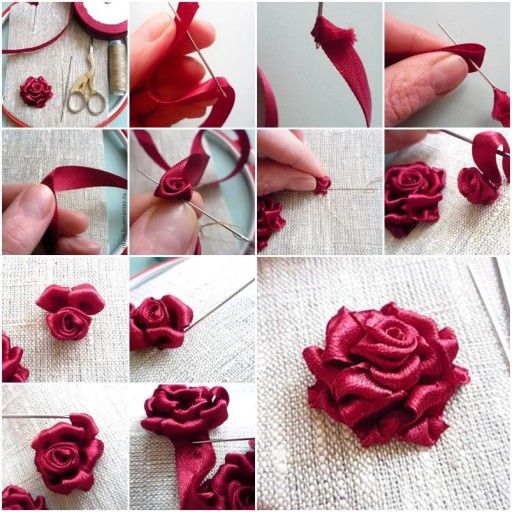
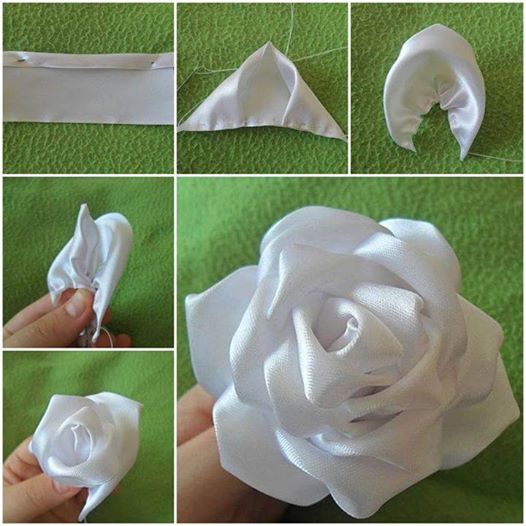
Crafting Ribbon Roses
Creating ribbon roses demands patience, precision, and attention to detail. Follow these steps carefully to craft beautiful roses that will elevate your bouquet.
Step 1: Preparing the Ribbon
Cut the ribbon into strips of varying lengths based on the size of the roses you wish to create. For a standard-sized rose, a strip measuring approximately 12 inches should suffice. This initial step is vital in determining the final appearance of your roses.
Step 2: Forming the Rose Center
Take one end of the ribbon and fold it diagonally to create a triangular shape. Secure the folded corner with a small piece of wire, twisting it tightly around the base to hold it in place. This forms the foundation of your rose and sets the stage for the subsequent steps.
Step 3: Building the Petals
Continue folding the ribbon in a zigzag pattern, securing each fold with wire as you progress. As you work your way down the ribbon, the petals will naturally begin to take shape, gradually forming the intricate structure of the rose.
Step 4: Shaping the Rose
Once you've utilized the entire ribbon strip, gently shape the rose by pulling the petals outward. This step is crucial in giving your rose a natural and lifelike appearance, enhancing its overall beauty and realism.
Building Your Bouquet
After creating a sufficient number of ribbon roses, it's time to assemble them into a cohesive and visually appealing bouquet.
Step 1: Arranging the Roses
Begin by arranging the roses in your desired pattern. You can place them side by side for a uniform look or stagger them for a more dynamic and visually interesting arrangement. Take your time during this step to ensure the overall design aligns with your vision.
Step 2: Securing the Stems
Use floral tape to wrap the stems of the roses together. This step provides stability to the bouquet, ensuring it maintains its shape and structure during handling and display. Pay close attention to detail to achieve a seamless finish.
Step 3: Adding Finishing Touches
Wrap green ribbon around the stems to conceal the floral tape and add an elegant finishing touch to your bouquet. This step not only enhances the visual appeal but also ties the entire arrangement together, creating a polished and professional look.
Personalizing Your Bouquet
One of the most appealing aspects of DIY ribbon rose bouquets is the ability to customize them to suit your unique preferences. Consider the following options to make your bouquet truly one-of-a-kind:
- Color Palette: Mix and match different colors to create a vibrant and eye-catching bouquet that reflects your personal style.
- Texture Exploration: Experiment with various types of ribbons to add depth and texture, making your bouquet more tactile and visually engaging.
- Varying Sizes: Incorporate roses of different sizes to create a dynamic arrangement that adds interest and dimension to your bouquet.
Expert Tips for Success
To help you achieve the best possible results, here are some additional tips for creating a stunning DIY ribbon rose bouquet:
- Practice Patience: Don't be discouraged if your initial attempts don't meet your expectations. Practice makes perfect, and each attempt will bring you closer to mastering the art of crafting ribbon roses.
- Focus on Detail: The more care and attention you invest in shaping each rose, the more impressive your bouquet will be. Small details can make a significant difference in the final outcome.
- Experiment with Arrangements: Try out different layouts and arrangements to find the one that best suits your style and preferences. Don't be afraid to think outside the box and embrace creativity.
Avoiding Common Pitfalls
While crafting your ribbon rose bouquet, be mindful of the following common mistakes to ensure a smooth and successful crafting experience:
- Choosing Low-Quality Materials: Using poor-quality ribbons and wires can compromise the overall appearance and durability of your bouquet. Always opt for high-quality materials to achieve the best results.
- Rushing the Process: Take your time and work at a steady pace to ensure each rose is crafted with precision and care. Rushing can lead to errors and a less-than-perfect final product.
- Ignoring Safety Precautions: Handle hot glue guns and sharp scissors with caution to avoid accidents and injuries. Safety should always be a top priority during the crafting process.
Maintaining Your Bouquet
Proper care and maintenance are essential to preserving the beauty and longevity of your DIY ribbon rose bouquet. Follow these care tips to ensure your bouquet remains stunning for years to come:
- Storage: Store your bouquet in a cool, dry place to protect it from moisture, which can cause damage to the ribbons and wires.
- Lighting: Avoid exposing your bouquet to direct sunlight, as prolonged exposure can cause the colors to fade over time, diminishing the bouquet's vibrancy.
- Cleaning: Gently dust your bouquet with a soft cloth to remove any accumulated dust, keeping it looking fresh and pristine.
Inspiration and Creative Ideas
For further inspiration, consider these creative ideas to enhance your DIY ribbon rose bouquet:
- Seasonal Themes: Design themed bouquets that reflect different seasons or holidays, adding a festive and timely touch to your arrangements.
- Embellishments: Incorporate additional embellishments such as beads, pearls, or lace to add extra flair and elegance to your bouquet.
- Unconventional Colors: Experiment with unconventional colors, such as metallic or neon ribbons, for a modern and bold twist that makes a statement.
Final Thoughts
Creating a DIY ribbon rose bouquet is a rewarding and enjoyable project that offers endless possibilities for creativity and self-expression. By following this comprehensive guide, you'll be able to craft a beautiful bouquet that is both meaningful and impressive. Remember to take your time, pay attention to detail, and most importantly, have fun with the process.
We encourage you to share your creations with others and leave a comment below to let us know how your bouquet turned out. For more crafting ideas and tutorials, explore our other articles on the site. Happy crafting!

Detail Author:
- Name : Destini Wyman
- Username : leanne.strosin
- Email : etrantow@hotmail.com
- Birthdate : 1989-02-07
- Address : 878 Kuhlman Squares Tressieland, VA 80969-8645
- Phone : +1-775-540-4409
- Company : Steuber Inc
- Job : Postal Service Mail Sorter
- Bio : Perferendis et dolore deserunt eum placeat. Omnis odit et voluptatem sint doloribus nam. Voluptatem aut iure adipisci rerum. Corporis rem cumque enim et.
Socials
tiktok:
- url : https://tiktok.com/@abe_xx
- username : abe_xx
- bio : Totam enim voluptatem officiis culpa aperiam asperiores repudiandae.
- followers : 6630
- following : 301
linkedin:
- url : https://linkedin.com/in/hamilla
- username : hamilla
- bio : Sunt ut ea praesentium est omnis vitae.
- followers : 1240
- following : 1862
twitter:
- url : https://twitter.com/ahamill
- username : ahamill
- bio : Rerum maxime sed voluptatem vel quia similique dolorem adipisci. Et ullam officiis quam incidunt necessitatibus eveniet ut. Sunt eius et dolorum.
- followers : 6759
- following : 2081
instagram:
- url : https://instagram.com/abe_hamill
- username : abe_hamill
- bio : Enim quam sunt dolores repellendus sed praesentium. Reiciendis consectetur veritatis tenetur dolor.
- followers : 1461
- following : 2887
facebook:
- url : https://facebook.com/abe_real
- username : abe_real
- bio : Quisquam sed illum aspernatur autem. Soluta a recusandae quidem consequatur.
- followers : 4588
- following : 2262
